
‹ Unlocking the Power of Atlas
Unlocking the Power of Atlas (7): Writing your own Analyzer — 1
A custom analyzer is an Atlas plug-in, starting from the sample project Atlas provides.
In this series, we’ve explored the fundamentals of Atlas — its graph representation, query language, and powerful visualization capabilities. We also covered the fundamental analyses using Atlas. Along the way, we’ve hinted at the potential to combine these features to create a custom analyzer tailored for specific software analysis tasks.
Now, the time has come to bring it all together. In the final two articles we’ll take a closer look at how to design and implement a custom software analyzer using Atlas. Let’s dive into the practical steps to unlock the full potential of this toolset.
Software Analyzers as Atlas plugins
Custom software analyzers in Atlas are developed as plug-ins, allowing you to extend its functionality for your specific analysis needs. To make it easy to get started, Atlas provides a sample plug-in project. Here’s how you can import it:
- Go to File -> New -> Other in the Atlas interface.
- In the pop-up screen, locate the Atlas category and select Sample Atlas Plug-in Project. The project will be in your workspace and can be accessed using the Project Explorer view.
- Provide a suitable name for your project. While it’s not mandatory, we recommend using a naming convention like
com.<organization_name>.<project_name>to ensure consistency and compatibility with other toolchains.
With the sample project in place, you’re ready to begin building your custom software analyzer.
Anatomy of an Atlas Plug-in
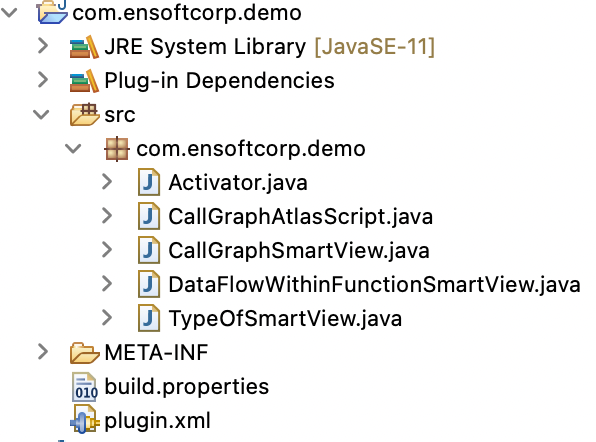
To understand how Atlas plug-ins work, let’s break down the anatomy of a sample Atlas plug-in project. The sample project typically includes five classes — Activator, CallGraphAtlasScript, CallGraphAtlasSmartView, DataFlowWithinFunctionSmartView, TypeOfSmartView. In the sample Atlas plug-in project, the three smart view classes can be grouped into one category, which we’ll cover later. Let’s first focus on the Activator class and the CallGraphAtlasScript.
- The
Activatorclass, together with the plug-in manifest, handles linking the plug-in with the rest of the Atlas toolchain. It’s responsible for initializing and managing the plug-in’s lifecycle, ensuring it integrates seamlessly with Atlas. Since its purpose is foundational, we recommend leaving this class unmodified to avoid any unintended disruptions. CallGraphAtlasScriptis where we’ll direct most of our attention in the second part of the article. This script illustrates how to transform the Atlas queries we’ve executed in Atlas Shell into pluggable, modularized code. By focusing on this script, you’ll learn how to encapsulate your analyses into reusable components that leverage Atlas’s graph representation and query capabilities, making them easier to integrate and extend.
Finally, we have the MANIFEST.MF and plugin.xml files, which manage the dependencies for your plug-in. These files allow you to import any external libraries you wish to use, making it possible to extend the functionality of your analyzer.
Atlas plug-ins are written in an embedded Domain-Specific Language (eDSL) that integrates seamlessly with Java. This integration allows you to enhance your plug-ins by leveraging Java libraries, offering unparalleled flexibility and versatility for building advanced software analysis tools. For example, you can combine Atlas’s analysis capabilities with a SAT solver like SAT4J to implement a feasibility checker, unlocking powerful problem-solving potential. Alternatively, you can develop your own custom solutions within Atlas; the possibilities are endless.
In this article, we’ve familiarized ourselves with the essentials of Atlas plug-ins. In the concluding section, we’ll dive deeper into the script, exploring how to write your own custom analyzer and understand the process in more detail.
Concluding in: Writing your own Analyzer — 2