
Azure DevOps のワークフローに SimDiff を組み込む
セルフホストの Windows エージェント上の Azure パイプラインが SimDiff Automation を実行し、ピアレビューファイルを公開します。
はじめに
これらの手順では、Simulink モデルファイルと Git を使う Azure DevOps のワークフローに SimDiff Automation を組み込みます。
Simulink ファイルへの変更がプッシュされると、パイプラインは SimDiff を使ってその変更のピアレビューファイルを作成し、アーティファクトとして Azure DevOps にアップロードします。この例では、ローカルの Windows PC 上のセルフホストエージェントを使います。
簡単な例から始める
前提条件
- Azure DevOps のアカウント
- Simulink ファイルを含む Azure DevOps Repos のリポジトリ
- Simulink、Git、SimDiff Automation をインストールした Windows PC
Azure DevOps のリポジトリにアクセスする
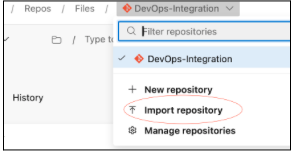
Azure DevOps のアカウントと、Simulink ファイルを含むリポジトリが必要です。サンプルリポジトリを、お使いの Azure DevOps 組織にインポートします。
- Import repository をクリックします。
- Clone URL の欄に
https://github.com/EnSoftCorp/devops-integration.gitと入力します。
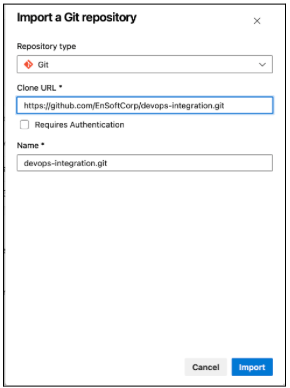
- Import をクリックします。リポジトリがインポートされます。
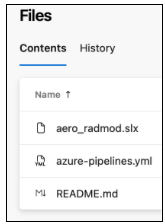
リポジトリには main と dev の 2 つのブランチがあります。main ブランチには aero_radmod.slx と、パイプラインが何を実行するかを指定する YAML ファイルがあります。その YAML ファイルは、ファイルのバージョン間の変更を SimDiff で報告するよう、すでに設定されています。
お使いのコンピュータにリポジトリをクローンする
同じ Git リポジトリを、ローカルの Windows PC にクローンします。クローン URL は Clone ボタンの下にあり、通常は Azure DevOps の Repos ページの右上にあります。
git clone git@ssh.dev.azure.com:##YourRepoURLinGitAzure DevOps 用の Git 資格情報を設定します。クローンするのは、Azure DevOps にインポートした GitHub のリポジトリではなく、お使いの Azure DevOps のリポジトリです。
セルフホストエージェントを構成して実行する
Azure のパイプラインが実行されると、ジョブが開始されます。エージェントは、そのジョブを実行するコンピュータとソフトウェアです。この例では、ローカル PC 上のセルフホストエージェントを使います。Microsoft は、セットアップを セルフホストの Windows エージェント に記載しています。以下の手順は、この例で使う部分を扱います。
- 組織の Settings を開き、Agent pools をクリックします。Add pool をクリックします。
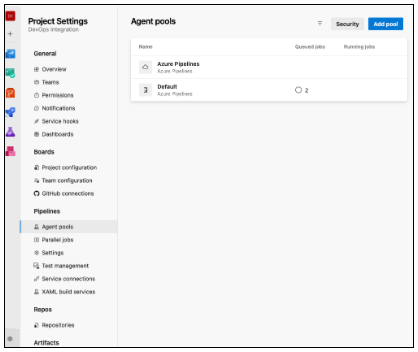
- エージェントプールを選択するか、新しく作成します。Add pool をクリックし、Pool type を Self-hosted に設定し、プールに名前を付けて、Create をクリックします。
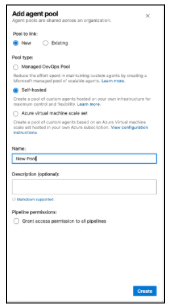
- エージェントプールを選択し、New agent をクリックします。

- Windows を選択し、エージェントをダウンロードします。
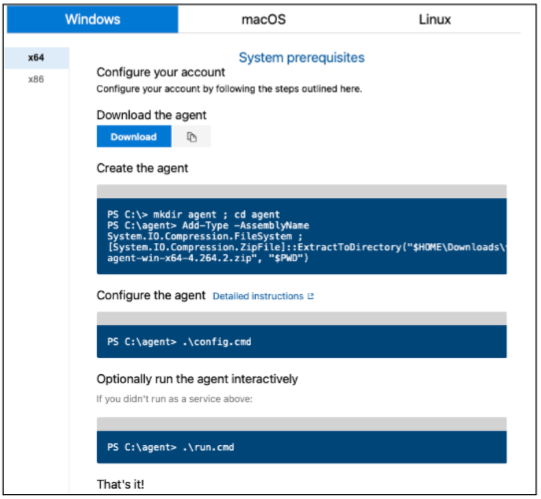
- エージェントを構成する前に、個人用アクセストークン(PAT)を作成します。Microsoft は、その手順を エージェント登録用の個人用アクセストークン に記載しています。
- そのページの手順に従って、Windows 上でエージェントを作成し、構成します。この例では Windows PowerShell を使います。管理者として PowerShell ウィンドウを起動し、エージェントを解凍したフォルダ(推奨される場所は
C:\agents)に移動して、.\config.cmdを実行します。一連の質問が表示されます。
- サーバー URL を入力します。組織の URL を使います。たとえば
https://dev.azure.com/{your-organization}です。 - 認証の種類を入力します。PAT の場合は Enter を押します。
- 上で作成した PAT を入力します。
.\run.cmdで、エージェントを対話モードで実行します。
Git で変更をプッシュする
エージェントを構成したら、以下の項目を確認し、その後に変更をプッシュしてパイプラインを起動します。
SimDiff Automation のインストールを確認します。 YAML ファイルは、SimDiff Automation が C:\Program Files\EnSoft\SimDiff Automation にインストールされていることを前提としています。そこにインストールされていない場合は、YAML ファイル内のその場所を変更します。
SimDiff Automation を設定します。 sd4.exe を、コマンドラインオプション -license と -matlabSetup を付けて実行し、ライセンスと MATLAB のインストールを設定します。その後、コマンドラインからレポートを生成できることを確認します。
YAML ファイルを確認します。 このサンプルは SimDiff を起動してレポートを生成します。aero_radmod.slx への変更がプッシュされると、パイプラインはレポートを生成し、アップロードします。後の節では、変更されたすべてのモデルファイルについてレポートが作られるよう、これを拡張します。
trigger:
branches:
 include:
   - "*"   # all branches
pool:
name: Default   # your self-hosted Windows agent


stages:
- stage: peer_review_file_generation
displayName: "Peer Review File Generation"


jobs:
- job: SimDiff_PeerReview
 displayName: "Generate SimDiff Peer Review File"


 steps:
 - checkout: self
   fetchDepth: 2 #fetch previous commit


 # ============ Set up DiffTool ===============
 - powershell: |
     git config --local difftool.simdiff.cmd '\"C:/Program Files/EnSoft/SimDiff Automation/sd4.exe\" -l \"$LOCAL\" -r \"$REMOTE\" -export aero_radmod_peerreview.html'
   displayName: "Prepare SimDiff command (Powershell)"


 # ============ Invoke SimDiff to Produce a Peer Review File ===============
 - powershell: |
     echo Comparing with SimDiff...
     git difftool -y -t simdiff HEAD~1 HEAD .\aero_radmod.slx
   displayName: "Run SimDiff comparison (Powershell)"


 # ============ Publish Artifact ===============
 - publish: $(System.DefaultWorkingDirectory)/aero_radmod_peerreview.html
   artifact: aero_radmod_peerreview.html
   displayName: "Publish SimDiff Peer Review File"
モデルファイルを変更してプッシュします。 aero_radmod.slx を変更し、コミットして、プッシュします。
これにより、Azure DevOps 上でパイプラインが開始されます。ローカル PC 上のセルフホストエージェントが SimDiff のピアレビューファイルを生成し、アーティファクトとしてアップロードします。
Azure DevOps でレポートのアーティファクトを確認する
- Pipelines に移動し、完了したばかりの実行を開きます。最新の実行を開き、Jobs に移動して、ジョブが成功したことを確認します。
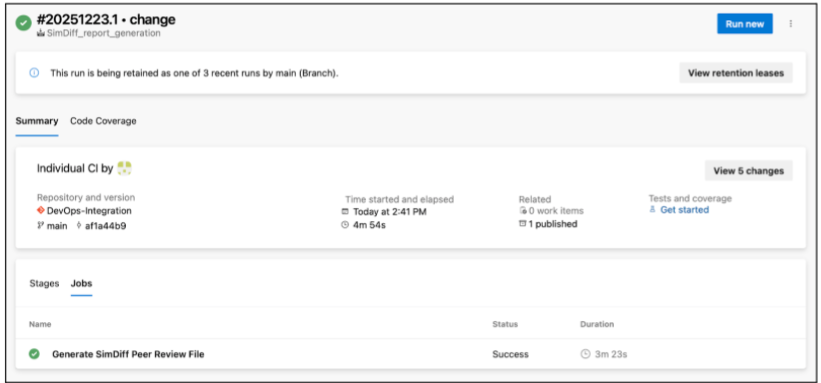
- 詳細を見るには、ジョブ(この例では Generate SimDiff Peer Review File)をクリックします。
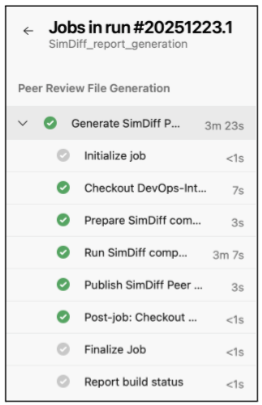
- 実行のアーティファクトをクリックし、次にレポートをクリックしてダウンロードします。
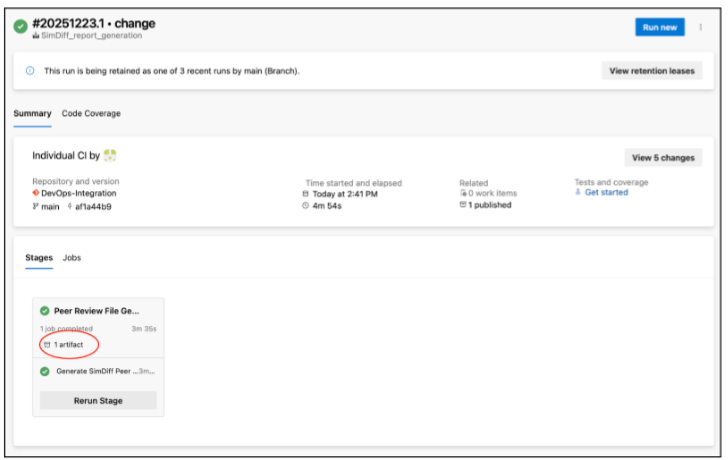
コミット内で変更されたすべてのモデルファイルを比較する
先の例は、aero_radmod.slx という名前のファイルが変更されることを前提としていました。コミット内で変更されたすべてのモデルファイルを報告するには、Python スクリプトを呼び出すように YAML ファイルを変更します。モデルファイルを変更するプッシュを行うと、変更されたファイルごとにレポートが作成され、そのレポートがアーティファクトとしてアップロードされます。サンプルスクリプトは、ファイルの現在のバージョン(HEAD)を、直前のコミットのバージョンと比較します。
前提条件
上記の前提条件に加えて、ローカルマシンに Python をインストールします。更新されたファイルを見るには、サンプルリポジトリの dev ブランチに切り替えます。
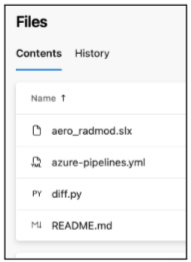
リポジトリの変更内容
dev ブランチには、新しい Python スクリプトを呼び出す、変更された YAML ファイルがあります。
更新後の YAML:
trigger:
branches:
 include:
   - "*"   # all branches


pool:
name: Default   # your self-hosted Windows agent


stages:
- stage: peer_review_file_generation
displayName: "Peer Review File Generation"


jobs:
- job: SimDiff_PeerReview
 displayName: "Generate SimDiff Peer Review File"


 steps:
 - checkout: self
   fetchDepth: 2 #fetch previous commit

 # ============ Invoke SimDiff to Produce a Peer Review File ===============
 - powershell: |
     echo Comparing with SimDiff...
     python .\diff.py reports HEAD~1 HEAD
   displayName: "Run SimDiff comparison (Powershell)"


 # ============ Publish Artifact ===============
 - publish: $(System.DefaultWorkingDirectory)/reports
   artifact: SimDiff_Peer_Review_Files
   displayName: "Publish SimDiff Peer Review Files"
Python スクリプト。 diff.py のリストを以下に示します。
import subprocess
import os
import sys


# Function to get the list of modified files in the commit
def get_modified_files():
 try:
     # Get the list of modified files (slx files) in the current commit
     result = subprocess.run(['git', 'diff', commit1, commit2, '--name-only', '--diff-filter=M'], stdout=subprocess.PIPE,
                             text=True,      # Ensure output is in string format
                             check=True)     # Raise an error if the command fails
     # Filter to include only Simulink model files (.slx or .mdl)
     modified_files = [line for line in result.stdout.splitlines() if (line.endswith('.slx') or line.endswith('.mdl'))]
     return modified_files
 except subprocess.CalledProcessError as e:
     print(f"Error getting modified files: {e}")
     return []


# Function to call SimDiff for each file
def run_simdiff_for_files(file):
     try:
         # Call the difftool (replace 'simdiff' with the actual command if different)
         report_file = f"{reportsDir}/" + file.removesuffix(".slx") + ".peerreview.html"
         print(f"    report_file= {report_file}")


         # Ensure report directory is created if it doesn't exist
         report_path = os.path.dirname(report_file)
         os.makedirs(report_path, exist_ok=True)

         path_to_diff_tool = f'"\'C:/Program Files/EnSoft/SimDiff Automation/sd4.exe\' -l $LOCAL -r $REMOTE -export {report_file}"'
         config_cmd = f'git config --local difftool.sd4.cmd {path_to_diff_tool}'
         #print(f"    config_cmd= {config_cmd}")
         subprocess.run(config_cmd, text=True, check=True, shell=True)
         diff_cmd = f'git difftool -y -t sd4 {commit1} {commit2} {file}'
         #print(f"    diff_cmd= {diff_cmd}")
         subprocess.run(diff_cmd, text=True, shell=True)

         #print(f"    SimDiff ran successfully for {file}\n")
     except subprocess.CalledProcessError as e:
         print(f"Error running SimDiff on {file}: {e}")


def main():
 modified_files = get_modified_files()
 if modified_files:
     print("Modified Simulink models:")
     for file in modified_files:
         print(f" - {file}")
         run_simdiff_for_files(file)
 else:
     print("No modified Simulink models found.")


if __name__ == '__main__':
 reportsDir = sys.argv[1]
 commit1 = sys.argv[2]
 commit2 = sys.argv[3]
 main()
モデルファイルを変更してプッシュする
変更をプッシュすると、変更されたモデルファイルごとにレポートが作成され、Azure DevOps にアーティファクトとしてアップロードされます。
お問い合わせ
これらの手順についてのご質問は、support@ensoftcorp.com までお問い合わせ下さい。
ご質問、または修正のご希望はありますか?
ありがとうございます。
このページについての内容を受け取りました。